Mouse and keyboard automation using Python
Handling mouse and keyboard of your system using python is easy with pyautogui package.
In this article, i'll show how to use this package to handle mouse and keyboard with python using pyautogui.
Let's understand axis on Monitor first.
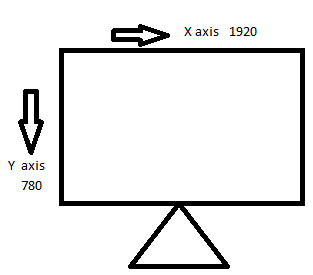
Monitor is treated as a graph of x axis and y axis and every position on monitor has co-ordinate in x and y axis, it is accessed by this co-ordinate.
Now, let's install the package first.
pip install pyautogui
Now, we can start implementing functions one by one.
- Size()
This function is used to get Screen resolution.
import pyautogui
print(pyautogui.size())
It will give you the size of the screen.
(1920, 1080)
- moveTo(): use this function move the mouse in pyautogui module.
import pyautogui
pyautogui.moveTo(100, 100, duration = 1)
This will move your mouse pointer from it’s current location to coordinates (100, 100), taking 1 second in this process.
- moveRel(): moves the mouse pointer relative to its previous position.
import pyautogui
pyautogui.moveRel(0, 50, duration = 1)
This will move mouse pointer at (0, 50) relative to its original position.
- position(): gives the current position of the mouse pointer.
import pyautogui
print(pyautogui.position())
This will print the current position of mouse pointer wherver it is, at the time of execution of time.
- click(): it is used for clicking and dragging the mouse
import pyautogui
pyautogui.click(100, 100)
It performs a typical mouse click at the location (100, 100).
- dragTo and dragRel:
They perform similar to moveTo and moveRel functions, except they hold the left mouse button while moving, thus initiating a drag.
This functionality can be used at various places, like moving a dialog box, or drawing something automatically using pencil tool in MS Paint.
import time

# a module which has functions related to time.
# It can be installed using cmd command:
# pip install time, in the same way as pyautogui.
import pyautogui
time.sleep(10)

# makes program execution pause for 10 sec
pyautogui.moveTo(1000, 1000, duration = 1)

# moves mouse to 1000, 1000.
pyautogui.dragRel(100, 0, duration = 1)

# drags mouse 100, 0 relative to its previous position,
# thus dragging it to 1100, 1000
pyautogui.dragRel(0, 100, duration = 1)
pyautogui.dragRel(-100, 0, duration = 1)
pyautogui.dragRel(0, -100, duration = 1)
- scroll(): it takes no. of pixels as argument, and scrolls the screen up to given number of pixels.
import pyautogui
pyautogui.scroll(200)
It scrolls the active screen up to 200 pixels.
- typewrite(): This automates typing of string. just pass the string which you want to type as argument.
import pyautogui
pyautogui.click(100, 100)
pyautogui.typewrite("HackersFriend!")
It will type Hackesfridnd at coordinates 100, 100 on screen.
- Passing key names: We can pass key names separately through typewrite() function.
import pyautogui
pyautogui.typewrite(["a", "left", "ctrlleft"])
- Pressing hotkey combinations: Use hotkey() function to press combination of keys like ctrl-c, ctrl-a etc.
import pyautogui
pyautogui.hotkey("ctrlleft", "a")
It will press left ctrl and “a” simultaneously. Thus in windows, this will result in selection of all text present on screen.