Building news aggregator web app with Django using python web scraping
We can build a news aggerator web app by scrapping the news websites and serving those scrapped news via Django on web or in any app.
In this article, i will explain step by step guide on how to implement everything. Let's start by understand what a news aggregator is and why should we build it.
What is news aggregator ?
A news aggregator is a system that takes news from several resources and puts them all together. A good example of news aggregator are JioNews and Google News.
Why build a news aggregator ?
There are hundreds of news websites, they do cover news on serveral broad topics, out of which only a few of them are of our interest. A news aggregator can be a tool to save a lot of time and with some modifications and filteration we can fine tune it to show only news of our interest.
A news aggregator can be an useful tool to get information within short time.
Plan
We'll build our news aggeragator in 3 parts. These are following:
- We'll research on html source code of news sites and build a website scrapper for each
- Then, We'll setup our django server
- Finally, we'll integrate everything altogether
So, let's start with first step.
Building the website scrapper
Before we start building scrapper, let's get the required packages first. You can install them from command prompt by these commads.
pip install bs4
pip install requests
This will install the required packages.
We are going to use timesofindia and hindustantimes as our news sources. We'll Get content from these two websites and integrate into our news aggregator.
Let's start by times of india... We'll take news from berief section of times of india. Here, we can see that news heading comes in h2 tag.
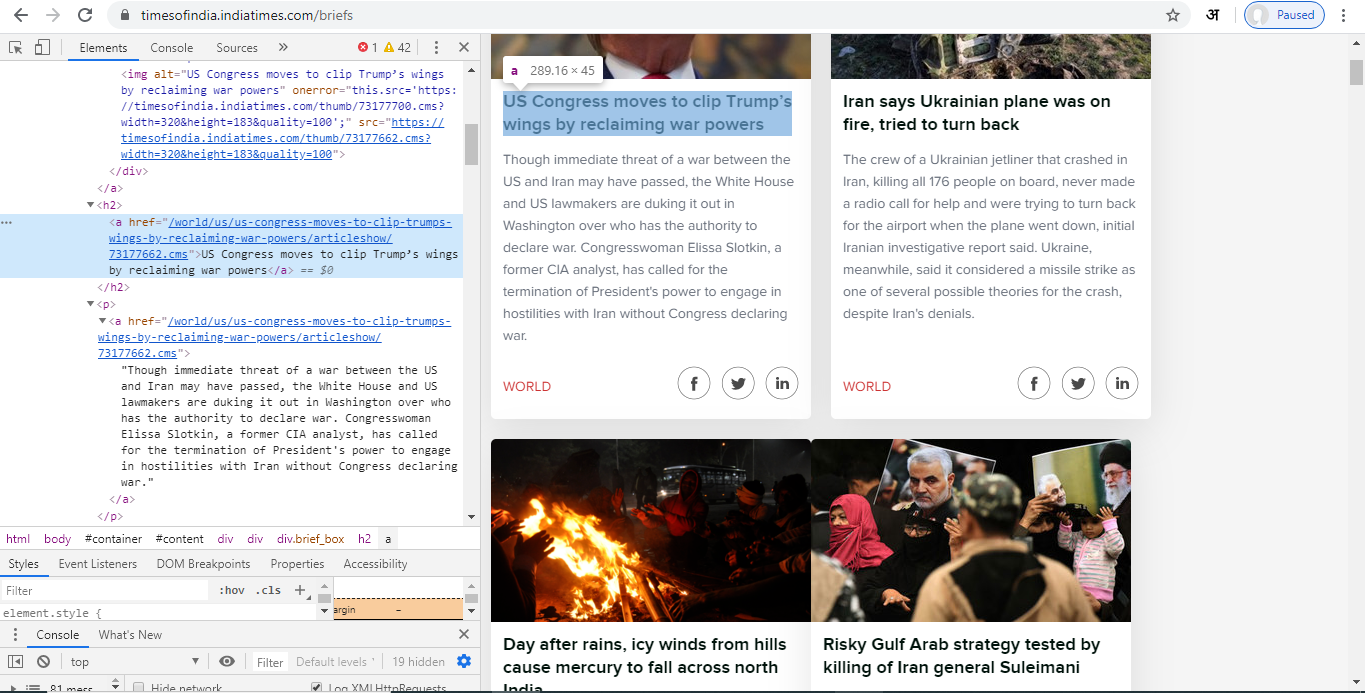
So we'll grab this tag. Here is how our scrapper will look like.
import requests
from bs4 import BeautifulSoup

r = requests.get("https://timesofindia.indiatimes.com/briefs")
soup = BeautifulSoup(r.content, 'html5lib')

headings = soup.find_all('h2')

headings = headings[0:-13] # removing footer links
This we'll get all the news headings from times of india.
Now, let's move to Hindustan times. We'll scrap india section of their website. Here we can see that, news is coming in a div with headingfour class.
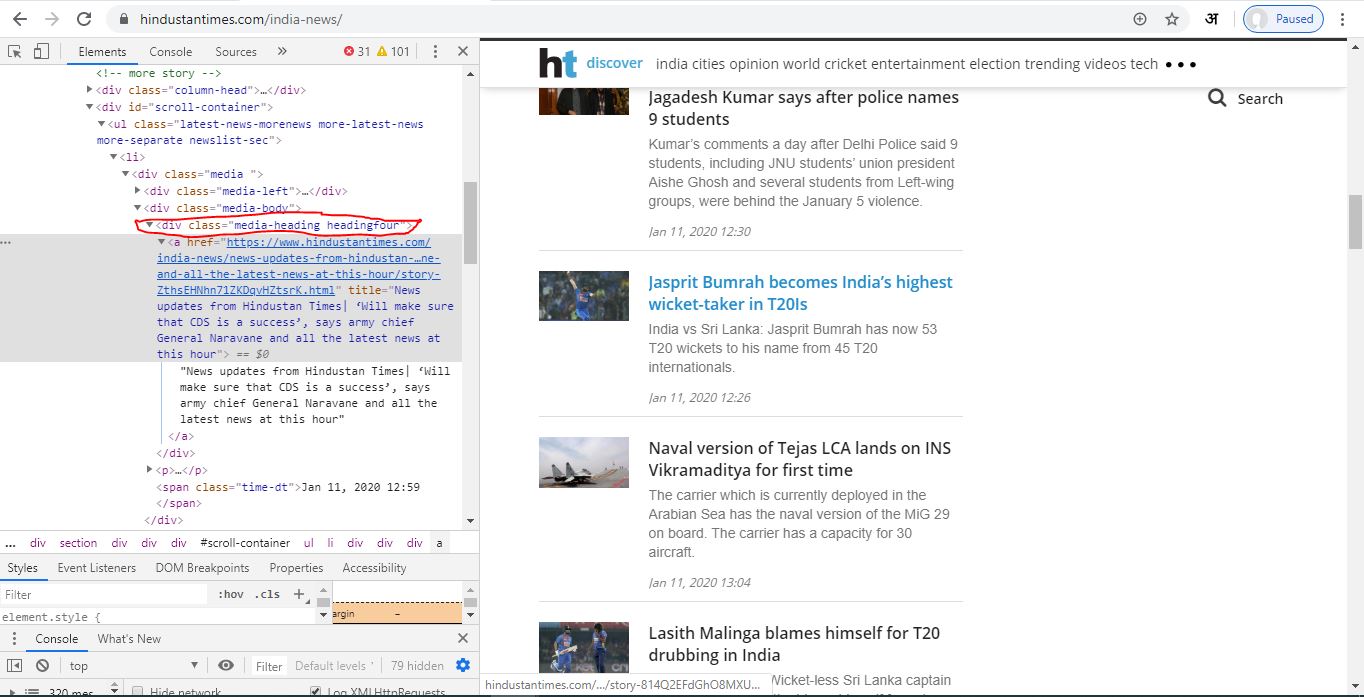
Let's write a scrapper for this div.
import requests
from bs4 import BeautifulSoup

r = requests.get("https://www.hindustantimes.com/india-news/")
soup = BeautifulSoup(r.content, 'html5lib')
newsDivs = soup.findAll("div", {"class": "headingfour"})
Now we have the news that, we want to display in our web app. We can start building our web app.
Building Django web app
To build web app with django, we need to install django on our system. You can install Django from following command.
pip install django
After installation of django, we can start building our web app. I'll call my app HackersFriend News Aggregator, you can give name of your app as per your choice, it doesn't matter. We will create the project from this command.
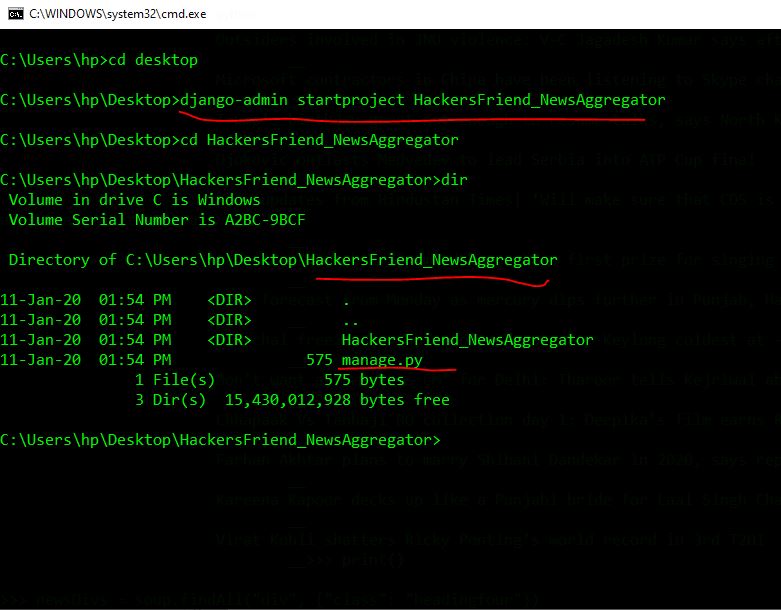
django-admin startproject HackersFriend_NewsAggregator
After that your directory structure should look like this.
Once we have manage.py file. We'll create app, in which our web app will live. Django, has convetion of keeping everything in seperate app, Inside a project. A project can have multiple apps.
So move into the project folder and create the app. This is the command to create app. I am calling the app news. You can give name of your choice.
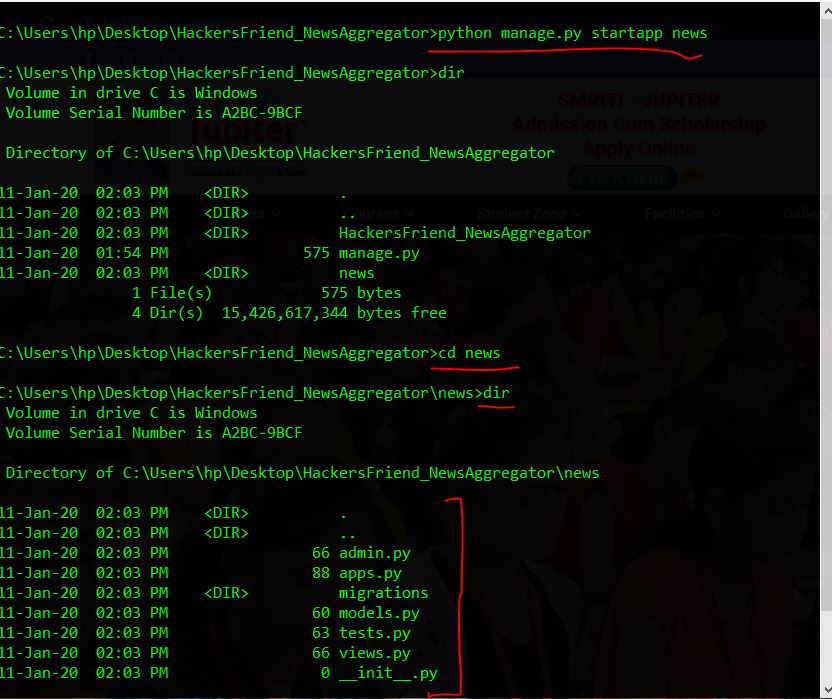
python manage.py startapp news
After that your directory should look like this.
Now, we'll add this news app to settings.py file in INSTALLED_APPS. So that, Django takes this app into consideration. Here is how your settings.py should look like after adding the news app:
"""
Django settings for HackersFriend_NewsAggregator project.

Generated by 'django-admin startproject' using Django 2.0.3.

For more information on this file, see
https://docs.djangoproject.com/en/2.0/topics/settings/

For the full list of settings and their values, see
https://docs.djangoproject.com/en/2.0/ref/settings/
"""

import os

# Build paths inside the project like this: os.path.join(BASE_DIR, ...)
BASE_DIR = os.path.dirname(os.path.dirname(os.path.abspath(__file__)))


# Quick-start development settings - unsuitable for production
# See https://docs.djangoproject.com/en/2.0/howto/deployment/checklist/

# SECURITY WARNING: keep the secret key used in production secret!
SECRET_KEY = 'x8pjg4!@v!csuw)1d-%&z)=24^^chn@=xncs#$9!@@zw0c$)ls'

# SECURITY WARNING: don't run with debug turned on in production!
DEBUG = True

ALLOWED_HOSTS = []


# Application definition

INSTALLED_APPS = [
    'django.contrib.admin',
    'django.contrib.auth',
    'django.contrib.contenttypes',
    'django.contrib.sessions',
    'django.contrib.messages',
    'django.contrib.staticfiles',
    'news'
]

MIDDLEWARE = [
    'django.middleware.security.SecurityMiddleware',
    'django.contrib.sessions.middleware.SessionMiddleware',
    'django.middleware.common.CommonMiddleware',
    'django.middleware.csrf.CsrfViewMiddleware',
    'django.contrib.auth.middleware.AuthenticationMiddleware',
    'django.contrib.messages.middleware.MessageMiddleware',
    'django.middleware.clickjacking.XFrameOptionsMiddleware',
]

ROOT_URLCONF = 'HackersFriend_NewsAggregator.urls'

TEMPLATES = [
    {
        'BACKEND': 'django.template.backends.django.DjangoTemplates',
        'DIRS': [],
        'APP_DIRS': True,
        'OPTIONS': {
            'context_processors': [
                'django.template.context_processors.debug',
                'django.template.context_processors.request',
                'django.contrib.auth.context_processors.auth',
                'django.contrib.messages.context_processors.messages',
            ],
        },
    },
]

WSGI_APPLICATION = 'HackersFriend_NewsAggregator.wsgi.application'


# Database
# https://docs.djangoproject.com/en/2.0/ref/settings/#databases

DATABASES = {
    'default': {
        'ENGINE': 'django.db.backends.sqlite3',
        'NAME': os.path.join(BASE_DIR, 'db.sqlite3'),
    }
}


# Password validation
# https://docs.djangoproject.com/en/2.0/ref/settings/#auth-password-validators

AUTH_PASSWORD_VALIDATORS = [
    {
        'NAME': 'django.contrib.auth.password_validation.UserAttributeSimilarityValidator',
    },
    {
        'NAME': 'django.contrib.auth.password_validation.MinimumLengthValidator',
    },
    {
        'NAME': 'django.contrib.auth.password_validation.CommonPasswordValidator',
    },
    {
        'NAME': 'django.contrib.auth.password_validation.NumericPasswordValidator',
    },
]


# Internationalization
# https://docs.djangoproject.com/en/2.0/topics/i18n/

LANGUAGE_CODE = 'en-us'

TIME_ZONE = 'UTC'

USE_I18N = True

USE_L10N = True

USE_TZ = True


# Static files (CSS, JavaScript, Images)
# https://docs.djangoproject.com/en/2.0/howto/static-files/

STATIC_URL = '/static/'
Now, let's create a template for home page.
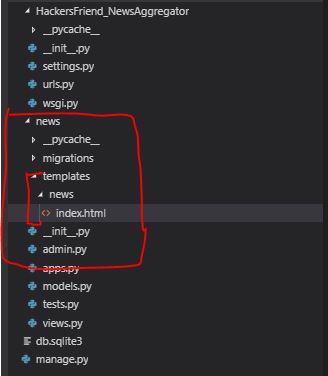
Go to news directory > create a directory with name templates > create a news directory inside templates directory and then create a index.html file inside this directory.
We'll use bootstrap 4, so include all the css links and js file links into page index.html. Also, we are going to pass two variables namely toi_news and ht_news from our views.py file to this template with news of times of india and hindustan times respectively and we'll loop through them and print the news. Here is how your index.html file should look like.
<!DOCTYPE html>
<html>
<head>
    <title></title>
    <link rel="stylesheet" href="https://maxcdn.bootstrapcdn.com/bootstrap/4.0.0/css/bootstrap.min.css" integrity="sha384-Gn5384xqQ1aoWXA+058RXPxPg6fy4IWvTNh0E263XmFcJlSAwiGgFAW/dAiS6JXm" crossorigin="anonymous">
</head>
<body>
    <div class="jumbotron">
        <center><h1>HackersFriend News Aggregator</h1>
           <a href="/" class="btn btn-danger">Refresh News</a>
        </form>
    </center>
    </div>
    <div class="container">
        <div class="row">
            <div class="col-6">
                    <h3 class="text-centre"> News from Times of india</h3>
                    {% for n in toi_news %}
                    <h5> -  {{n}} </h5>
                    <hr>
                    {% endfor %}
                    <br>
            </div>
            <div class="col-6">
                    <h3 class="text-centre">News from Hindustan times</h3>
                    {% for htn in ht_news %}
                    <h5> - {{htn}} </h5>
                    <hr>
                    {% endfor %}
                    <br>
            </div>
        </div>


</div>
    <script
src="http://code.jquery.com/jquery-3.3.1.min.js"
integrity="sha256-FgpCb/KJQlLNfOu91ta32o/NMZxltwRo8QtmkMRdAu8="
    crossorigin="anonymous"></script>
    <script src="https://cdnjs.cloudflare.com/ajax/libs/popper.js/1.12.9/umd/popper.min.js" integrity="sha384-ApNbgh9B+Y1QKtv3Rn7W3mgPxhU9K/ScQsAP7hUibX39j7fakFPskvXusvfa0b4Q" crossorigin="anonymous"></script>
    <script src="https://maxcdn.bootstrapcdn.com/bootstrap/4.0.0/js/bootstrap.min.js" integrity="sha384-JZR6Spejh4U02d8jOt6vLEHfe/JQGiRRSQQxSfFWpi1MquVdAyjUar5+76PVCmYl" crossorigin="anonymous"></script>
</body>
</html>
Now, we can create views.py file.
Inside views.py file we will create news scrapper of both news sites.
Here is how our views.py file looks.
from django.shortcuts import render
import requests
from bs4 import BeautifulSoup

# GEtting news from Times of India

toi_r = requests.get("https://timesofindia.indiatimes.com/briefs")
toi_soup = BeautifulSoup(toi_r.content, 'html5lib')

toi_headings = toi_soup.find_all('h2')

toi_headings = toi_headings[0:-13] # removing footers

toi_news = []

for th in toi_headings:
    toi_news.append(th.text)


#Getting news from Hindustan times

ht_r = requests.get("https://www.hindustantimes.com/india-news/")
ht_soup = BeautifulSoup(ht_r.content, 'html5lib')
ht_headings = ht_soup.findAll("div", {"class": "headingfour"})
ht_headings = ht_headings[2:]
ht_news = []

for hth in ht_headings:
    ht_news.append(hth.text)


def index(req):
    return render(req, 'news/index.html', {'toi_news':toi_news, 'ht_news': ht_news})
Once, we are done with template and views creation, we can add this view to our urls.py file to server the view.
Move to HackersFriend_NewsAggregator diectory and open urls.py file and there you need to import news view and add this view to url.
Here is how urls.py looks after adding.
"""HackersFriend_NewsAggregator URL Configuration

The `urlpatterns` list routes URLs to views. For more information please see:
    https://docs.djangoproject.com/en/2.0/topics/http/urls/
Examples:
Function views
    1. Add an import:  from my_app import views
    2. Add a URL to urlpatterns:  path('', views.home, name='home')
Class-based views
    1. Add an import:  from other_app.views import Home
    2. Add a URL to urlpatterns:  path('', Home.as_view(), name='home')
Including another URLconf
    1. Import the include() function: from django.urls import include, path
    2. Add a URL to urlpatterns:  path('blog/', include('blog.urls'))
"""
from django.contrib import admin
from django.urls import path
from news import views

urlpatterns = [
    path('admin/', admin.site.urls),
    path('', views.index, name = "home"),
]
After that, we are done. Now you can run your web app from command window. Use this command to run the app.
python manage.py runserver
after that, you can open 127.0.0.1:8000 and you should see the news aggregator app's homepage.

That's certainely not the most beautifule news app on the internet, but you get the idea how we can build a news aggregator.
You can add a lot of features on top of it. Like showing news on certain topic, aggregating from several websites etc.
Here is github repo for all the codes: https://github.com/hackers-friend/HackersFriend-NewsAggregator