Building a simple To Do list app using HTML CSS Javascript
To do lists are very important, when you want to organize your day and work. Though, there are several apps in market, it is fun to create your own version of it. In this article, I'll create a To Do list app using HTML, CSS and plain JavaScript. It will allow adding on of new work item, deleting of items, marking any work item as done.
Let's start with HTML.
We'll create a div that will contain input field and button to add new work item. Then we will create an unordered list, that will store all of our work items.
<div id="addContainer" class="adder">
  <h2>My To Do List</h2>
  <input type="text" id="workItem" placeholder="Work Item...">
  <span onclick="addNewItem()" class="addBtn">Add</span>
</div>

<ul id="workItems">
  <li>Sample Item 1</li>
</ul>
Let's add some css to do styling.
/* Include the padding and border in an element's total width and height */
* {
  box-sizing: border-box;
}

/* Remove margins and padding from the list */
ul {
  margin: 0;
  padding: 0;
}

/* Style the list items */
ul li {
  cursor: pointer;
  position: relative;
  padding: 12px 8px 12px 40px;
  background: #eee;
  font-size: 18px;
  transition: 0.2s;

  /* make the list items unselectable */
  -webkit-user-select: none;
  -moz-user-select: none;
  -ms-user-select: none;
  user-select: none;
}

/* Set all odd list items to a different color (zebra-stripes) */
ul li:nth-child(odd) {
  background: #f9f9f9;
}

/* Darker background-color on hover */
ul li:hover {
  background: #ddd;
}

/* When clicked on, add a background color and strike out text */
ul li.checked {
  background: #888;
  color: #fff;
  text-decoration: line-through;
}

/* Add a "checked" mark when clicked on */
ul li.checked::before {
  content: '';
  position: absolute;
  border-color: #fff;
  border-style: solid;
  border-width: 0 2px 2px 0;
  top: 10px;
  left: 16px;
  transform: rotate(45deg);
  height: 15px;
  width: 7px;
}

/* Style the close button */
.close {
  position: absolute;
  right: 0;
  top: 0;
  padding: 12px 16px 12px 16px;
}

.close:hover {
  background-color: #f44336;
  color: white;
}

/* Style the header */
.adder {
  background-color: black;
  padding: 30px 40px;
  color: white;
  text-align: center;
}

/* Clear floats after the header */
.adder:after {
  content: "";
  display: table;
  clear: both;
}

/* Style the input */
input {
  margin: 0;
  border: none;
  border-radius: 0;
  width: 75%;
  padding: 10px;
  float: left;
  font-size: 16px;
}

/* Style the "Add" button */
.addBtn {
  padding: 10px;
  width: 25%;
  background: #d9d9d9;
  color: #555;
  float: left;
  text-align: center;
  font-size: 16px;
  cursor: pointer;
  transition: 0.3s;
  border-radius: 0;
}

.addBtn:hover {
  background-color: #bbb;
}
Finally, we'll add the Javascript that will work on click on Add Button, Delete button and Mark as done button.
// Create a "close" button and append it to each list item
var myNodelist = document.getElementsByTagName("LI");
var i;
for (i = 0; i < myNodelist.length; i++) {
  var span = document.createElement("SPAN");
  var txt = document.createTextNode("\u00D7");
  span.className = "close";
  span.appendChild(txt);
  myNodelist[i].appendChild(span);
}

// Click on a close button to hide the current list item
var close = document.getElementsByClassName("close");
var i;
for (i = 0; i < close.length; i++) {
  close[i].onclick = function() {
    var div = this.parentElement;
    div.style.display = "none";
  }
}

// Add a "checked" symbol when clicking on a list item
var list = document.querySelector('ul');
list.addEventListener('click', function(ev) {
  if (ev.target.tagName === 'LI') {
    ev.target.classList.toggle('checked');
  }
}, false);

// Create a new list item when clicking on the "Add" button
function addNewItem() {
  var li = document.createElement("li");
  var inputValue = document.getElementById("workItem").value;
  var t = document.createTextNode(inputValue);
  li.appendChild(t);
  if (inputValue === '') {
    alert("You must write something!");
  } else {
    document.getElementById("workItems").appendChild(li);
  }
  document.getElementById("workItem").value = "";

  var span = document.createElement("SPAN");
  var txt = document.createTextNode("\u00D7");
  span.className = "close";
  span.appendChild(txt);
  li.appendChild(span);

  for (i = 0; i < close.length; i++) {
    close[i].onclick = function() {
      var div = this.parentElement;
      div.style.display = "none";
    }
  }
}
Here is how our Final HTML code looks like this.
<!DOCTYPE html>
<html>
<head>
<meta name="viewport" content="width=device-width, initial-scale=1">
<style>
/* Include the padding and border in an element's total width and height */
* {
  box-sizing: border-box;
}

/* Remove margins and padding from the list */
ul {
  margin: 0;
  padding: 0;
}

/* Style the list items */
ul li {
  cursor: pointer;
  position: relative;
  padding: 12px 8px 12px 40px;
  background: #eee;
  font-size: 18px;
  transition: 0.2s;

  /* make the list items unselectable */
  -webkit-user-select: none;
  -moz-user-select: none;
  -ms-user-select: none;
  user-select: none;
}

/* Set all odd list items to a different color (zebra-stripes) */
ul li:nth-child(odd) {
  background: #f9f9f9;
}

/* Darker background-color on hover */
ul li:hover {
  background: #ddd;
}

/* When clicked on, add a background color and strike out text */
ul li.checked {
  background: #888;
  color: #fff;
  text-decoration: line-through;
}

/* Add a "checked" mark when clicked on */
ul li.checked::before {
  content: '';
  position: absolute;
  border-color: #fff;
  border-style: solid;
  border-width: 0 2px 2px 0;
  top: 10px;
  left: 16px;
  transform: rotate(45deg);
  height: 15px;
  width: 7px;
}

/* Style the close button */
.close {
  position: absolute;
  right: 0;
  top: 0;
  padding: 12px 16px 12px 16px;
}

.close:hover {
  background-color: #f44336;
  color: white;
}

/* Style the header */
.adder {
  background-color: black;
  padding: 30px 40px;
  color: white;
  text-align: center;
}

/* Clear floats after the header */
.adder:after {
  content: "";
  display: table;
  clear: both;
}

/* Style the input */
input {
  margin: 0;
  border: none;
  border-radius: 0;
  width: 75%;
  padding: 10px;
  float: left;
  font-size: 16px;
}

/* Style the "Add" button */
.addBtn {
  padding: 10px;
  width: 25%;
  background: #d9d9d9;
  color: #555;
  float: left;
  text-align: center;
  font-size: 16px;
  cursor: pointer;
  transition: 0.3s;
  border-radius: 0;
}

.addBtn:hover {
  background-color: #bbb;
}
</style>
</head>
<body>

<div id="myDiv" class="adder">
  <h2>My To Do List</h2>
  <input type="text" id="workItem" placeholder="Work Item...">
  <span onclick="addNewItem()" class="addBtn">Add</span>
</div>

<ul id="workItems">
  <li>Sample Item 1</li>
</ul>

<script>
// Create a "close" button and append it to each list item
var myNodelist = document.getElementsByTagName("LI");
var i;
for (i = 0; i < myNodelist.length; i++) {
  var span = document.createElement("SPAN");
  var txt = document.createTextNode("\u00D7");
  span.className = "close";
  span.appendChild(txt);
  myNodelist[i].appendChild(span);
}

// Click on a close button to hide the current list item
var close = document.getElementsByClassName("close");
var i;
for (i = 0; i < close.length; i++) {
  close[i].onclick = function() {
    var div = this.parentElement;
    div.style.display = "none";
  }
}

// Add a "checked" symbol when clicking on a list item
var list = document.querySelector('ul');
list.addEventListener('click', function(ev) {
  if (ev.target.tagName === 'LI') {
    ev.target.classList.toggle('checked');
  }
}, false);

// Create a new list item when clicking on the "Add" button
function addNewItem(){
  var li = document.createElement("li");
  var inputValue = document.getElementById("workItem").value;
  var t = document.createTextNode(inputValue);
  li.appendChild(t);
  if (inputValue === '') {
    alert("You must write something!");
  } else {
    document.getElementById("workItems").appendChild(li);
  }
  document.getElementById("workItem").value = "";

  var span = document.createElement("SPAN");
  var txt = document.createTextNode("\u00D7");
  span.className = "close";
  span.appendChild(txt);
  li.appendChild(span);

  for (i = 0; i < close.length; i++) {
    close[i].onclick = function() {
      var div = this.parentElement;
      div.style.display = "none";
    }
  }
}
</script>

</body>
</html>
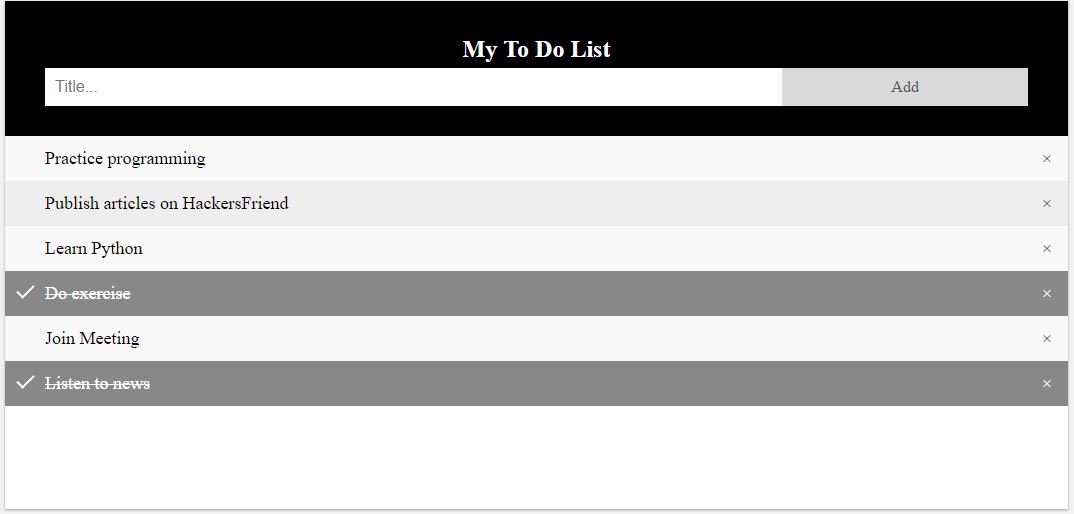
This will produce this kind of UI.
Refrence : w3schools